Monday, October 26, 2015

Obsessive Christmas Disorder


First off, I am officially and totally done with all projects Hallowedding. The petticoat proved to be much harder and time consuming than I had anticipated. I ended up just sewing a layer onto a petticoat I found at Arc's when the Bootique opened. It took me more than three and a half hours to sew the 45 yards onto the bottom. (That isn't even counting the week previous I spent finishing that length with ribbon!) Unfortunately, I greatly under estimated how much I needed to sew all the way around the bottom and it would have cost me about two new petticoats from Tatyana to complete this project if I were to go buy more ribbon. I needed to re-elastic the old petticoat anyway, so before I did that I just lopped off the section that I didn't have enough finished tulle for and sewed it back together. It isn't as fluffy as it would have been, obviously, and it's a little tight in the hips if I wear it down too low, but it's done!!! All that's left is to prepare food tomorrow and I'm even considering cheating and just buying pizza dough from Trader Joe's. I have entirely checked out of Halloweentown and am now residing in Christmastown.


We made our usual thrift stop and they were setting up Thriftmas!!! I'm positive that I was hovering and annoying the volunteers, but I needed to be the first to see the treasures! My thrift nemesis was there, as usual, and she and her friend said, "there doesn't seem to be any old stuff. They probably just put it on eBay..." HAHAHAHAHAHAHAHA!!!! No, I just put it all in my cart, Betches! There wasn't much, but there wasn't much put out in general. I picked up a ceramic tree that miraculously isn't missing any bulbs. The musical angel is made in Japan, has the most precious eyelashes, and still works! I picked up 5 Corelle plates to match the mugs we have. I'm not sure how old the Santa picks actually are, but for 99 cents each I wasn't about to leave them behind. They're my favorite! The mug isn't old, but too cute not to bring home. I hope that they have more vintage stuff once they get it all set up. BJ and I are leaving very early the morning after our wedding to be in line for the grand opening of the Thriftmas shop.


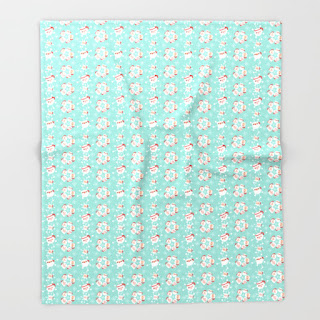
I was trending on Spoonflower with my new design for a few days. I bought this design in minky. Let me tell you that it is truly like a warm fuzzy hug from the ghost of Christmas Past. The best way to spread Christmas cheer is to sing loud for all to hear. The second best way to buy this.


If you can't sew, they now have blankets on Society6!!! I think I'm going to get one of these if we get a decent amount of money from the wedding because I need more than a lap blanket to keep me warm. 


I wish they weren't so expensive. There aren't any promotions going on right now, so I'm definitely waiting until there is one.


I think I need it in a phone case, too. There are also new ceramic double walled travel mugs. I made this design into leggings and all over print shirts as well. This design is my favorite! I just can't get enough of it.


The 2016 tea towel contest is now open for voting! I made a Pyrex themed one again.

I'm off to do a whole lot of nothing with my best furry friends! Please cross your fingers it doesn't snow on Saturday...

Thursday, October 22, 2015

To the Moon and Back


I am officially down to just one thing on my to-make list for the Hallowedding!!! I spent last Friday working on this giant moon for the photo booth. It is made out of a huge sheet of polystyrene board from Menards. We had to have BJ's aunts come pick it up from the store for us because it didn't fit in the car. I'm probably going to have to cut off the pointy parts to get it to fit in a vehicle to take down to my mom's house. Basil has had quite the time scratching it to shreds so that can't come soon enough...

This is approximately 5.5 feet tall and wide and there isn't a lot of space in my apartment so this is the best picture I can get of it, but I'm sure I'll get a better shot of it once it is set up at the location. I really had no idea of how large it would end up when I was just throwing it around as an idea, so the fabric I bought to use as a back drop is not large enough... I may have to go get more and sew it together.


This is how it looked at the first go around. I hated it and was so frustrated. I thought I was going to have to completely start over. I decided that I would try to make it look better with what I had and if it was unfixable, at least I'd have some kind of pattern to go off of with a new sheet.


I used the reverse side to figure out a new design and cut it down from there. The permanent marker was nearly impossible to cover! I had to use four or five coats of gesso and three layers of orange. It was a really messy project that my cats made messier. Please send us a house with a garage so I don't have to live in a constant disaster area!


I made this little chalkboard sign out of extra foam board from the framed half pumpkin project. BJ always says it to me so I thought it would be a perfect prop.


When we went to visit the shop last weekend we didn't leave empty handed. All the Halloween ephemera and the plastic cat parts were 25% off and the paper pieces were marked only $1 each! There were more pumpkins, but I thought I should show a little self restraint. The blow mold pail is huge. I'm going to use it to hold cards at the party. Bonus, it is one I don't have! Some of the vendors started putting Christmas up. I only got two things. So. Hard. BJ really liked the Mr. and Mrs. Claus and the embroidered towel was too beautiful to leave behind! The ornaments are hanging from tinsel that has been sewn on and there are little rhinestones on the pine branch. I'm getting Christmas fever and Halloween isn't even over yet!


I'm really hoping to finish my petticoat today. Everything is cut out and I have the ribbon pinned to edge of the bottom ruffles. Let's just hope that my sewing machine doesn't decided to be the piece of crap is usually is! Once that is done, I'm going to make an Audrey II using a fake potted plant I found at the thrift store.

T minus 9 days and counting!

Wednesday, October 14, 2015

Bakelite Heaven?


BJ and I had a really great day on Saturday. We started out at an estate sale with a ton of vintage Christmas ornaments and then decided to stop by an occasional sale. We were going to go to both of the ones we usually visit, but had such an epic haul we decided to end it at the first stop. BAKELITE!!! The Hazel Atlas set was the last thing we found there and it was the icing on our vintage cake, but lets get to the good stuff.


The orange one is what caught my eye. It was on a normal bangle holder with a few other not as interesting bracelets. I was hoping so hard that it was Bakelite! Then I turned to my left and there was this enormous annoying display of bangles. SO many of them looked like Bakelite I couldn't believe my eyes! Of course I set to work taking off every single one that I thought had potential. There ended up being 15 in all. The only one that was above $5  was the first one I spotted, everything else was $5 or under!!! These two above are my absolute favorites. I can't fully capture their beauty in a photo, they are so much better in person!


I was super stoked to find a matched set on separate sides of the display! They are gorgeous. The yellow ones aren't fancy, but the rich egg yolk and buttery yellow colors are to die for. I'm back and forth on the root beer one.


These were a package deal. The top ones look red in the picture, but are really a dark reddish orange. They aren't even an exact match set, but close enough to fool the eye. The ones on the bottom I'm kind of indifferent to.


The one in the front has a jade shade on the inside. I think I'm going to get that one restored and possibly the one on the left. That one has a weird patina like a yellow one I found at the thrift store where there is a stripe of a lighter shade down the center of the outside. The dark green one is perfect as is. After this haul, I definitely need to get on making a new display so they aren't falling all over the floor!


We got lucky at the antique mall the weekend before. I found a complete set of Halloween cookie cutters in the box. We paid less for this complete set than one we found (but didn't buy) earlier this spring at an estate sale which was missing two cutters. I've been wanting this for my Halloween collection so, WOO HOO! The Rosbro candy container has seen better days, but it was cheap enough that I can forgive it's pre-loved condition.


We also had a week of hitting the jackpot multiple times at our main thrift store. I found a framed copy of a vintage treat bag, a bag of chenille chain garland, and 3 vintage honey comb ghosts still in their packages!


BJ found me toy Pyrex! These came in a bag of toy Corning all with their lids, so I'm wondering why the Pyrex couldn't have been complete, but I'll take what I can get! The kelly green 024 was priced by the crackhead who thinks everything vintage is gold. I really don't like that person... We got it anyway because we had a coupon and found a bunch of other stuff to make it worthwhile. I picked up a bunch of vintage dresses. Most of them I think I'll list on Etsy once all the party prep is over and I have time. 

Our Hallowedding party and our booth upgrade is just a few weeks away, I can't believe it! I have one more big thing to make for the party and I need to try to make my petticoat.

I spent the entire day Monday making new Spoonflower designs which should be available for purchase in about 2 weeks. You can see the new designs here.

I think that gets us all caught up on the various things I've been doing. I hope to have something new to share soon!

Tuesday, October 13, 2015

More Halloween Crafts


I didn't exactly meet my deadline for the above craft, so sorry for not sharing when I said I would. I kept reminding BJ to take me somewhere to get a hinge and he would say, "Ok, let's go somewhere else first [instead.]" So I had it almost entirely completed, but couldn't make the hinged parts until I had the hinge. 


If you didn't know, this is the Sanderson Sisters' spellbook from Hocus Pocus. It is a big book that is covered in homemade paper mache, polymer clay, and paint. I used glow in the dark clay for the eyeball for extra creepiness. I'm happy overall with how it turned out, minus the lazy sculpts on the "metal" pieces.


I found this table at the Goodwill a couple of months ago. It used to be pink and green and white. I thought it would look very Burton-esque if painted black and white. This project took me about 6 hours. The lines are a bit wonky because my brush was really nasty with paint by the end of it and I for some reason didn't remember to use the painters tape I had right next to me... I might touch the vertical lines up.


This bat chandelier also took me a lot longer than expected. I spent a few hours just tying everything together and the bats on, but it is really cool!


I've got a pretty awesome vintage haul to share with you, so stay tuned!

Monday, October 5, 2015

Halloween Crafts


Last week I took a much needed break after nearly a month of triple the workload, but now it's October and I'm into the home stretch. BJ and I are having a small, family only, Hallowedding party on the 31st. It's not something we can or want to have a huge budget for, so there is a lot of DIY-ing and thrifting happening, including having my sister officiate! I thought I'd share some of the things I've been working on.

 I made a shrunken head using this pattern. I was going to make him last year, but was intimidated by the fact that the person who wrote the pattern said that is was extremely complicated. If you're comfortable with amigurumi then I don't think you'll have trouble with this pattern. It took FOREVER though! The hair was the worst part. I used the method where you tie a knot of thread around each strand of yarn wrapped around something the length that you want the hair (macaroni sized box for me.) Then sewing it onto the head.... But I think it was all worth it! He is seen here modeling a pair of bakelite clip-on earrings I found recently at the thrift store for 1.49! 


I saw this project on Instagram and knew I had to make it! I think I'm going to add a small paper bunting that says welcome or something to use for the party. This was really simple and almost everything came from Michaels. I got the foam board the fabric is glued to at the Dollar Tree to save on costs and the fabric is from my extensive stash, but can still be found at Joann Fabrics. As an added bonus, I had enough foam board left over for another project I've been thinking about. That one is currently in the drying stage and I'll share once it is all finished!


I also finally finished my Halloween countdown! I really like how it turned out. I started this project months ago, but couldn't find the tombstones. They were at Michaels the whole time, I must have just not seen them every time I looked! I saw a Halloween countdown decoration at Michaels and thought it would be fun to make one myself. I didn't start the project thinking of doing a tutorial so apologies for the crappy pictures and lack of in progress shots. If you'd like to make your own, here's what you'll need:
  • a pack of chalkboard tombstones from the kid's Halloween craft section at Michaels
  • a wooden circle for moon
  • 2 small wooden fence shapes
  • a broken wood shaped hanging sign (this and 2 above from wood craft section)
  • scrapbook letters (I got mine from Target)
  • paint (chalkboard, brown, black, white, yellow glow in the dark, plain glow in the dark
  • craft moss
  • E600 and hot glue

I started by doing a brown wash on the sign. To achieve this, I mixed brown paint with water until I got the look that I wanted. 


While that is drying, I gave a gray wash to the fences so they would look less bright. Mix white with black a drop at a time until you get the shade you want and then mix with water.


I painted the tombstones straight black and painted the edges of both the tombstones and fences with glow in the dark paint to get an edge light effect.

For the moon I mixed the yellow glow in the dark paint with a light gray and gave it a little dimension to look like the moon. Then I put a coat of plain glow in the dark paint on top .

I free hand painted on the bat using chalkboard paint.

Once everything is dry, glue it all on. I used E600 on the tombstones and moon. Then I hot glued moss to the bottom edge and E600 on the fence on top of everything. Place your scrapbook letters where you want them. Mine are stickers, but not very strong so I glued them on as well. And you're done!

There are a bunch of other Halloween projects that I'm going to try to get done, including a black and orange petticoat. Crossing my fingers it turns out! I started a really fun project last week that I am going to try to hold myself to finishing tomorrow so check back soon for more on that and some Halloween goodies we've picked up!

P.S. I guess this is the 100th blog I've posted. Is anyone reading?